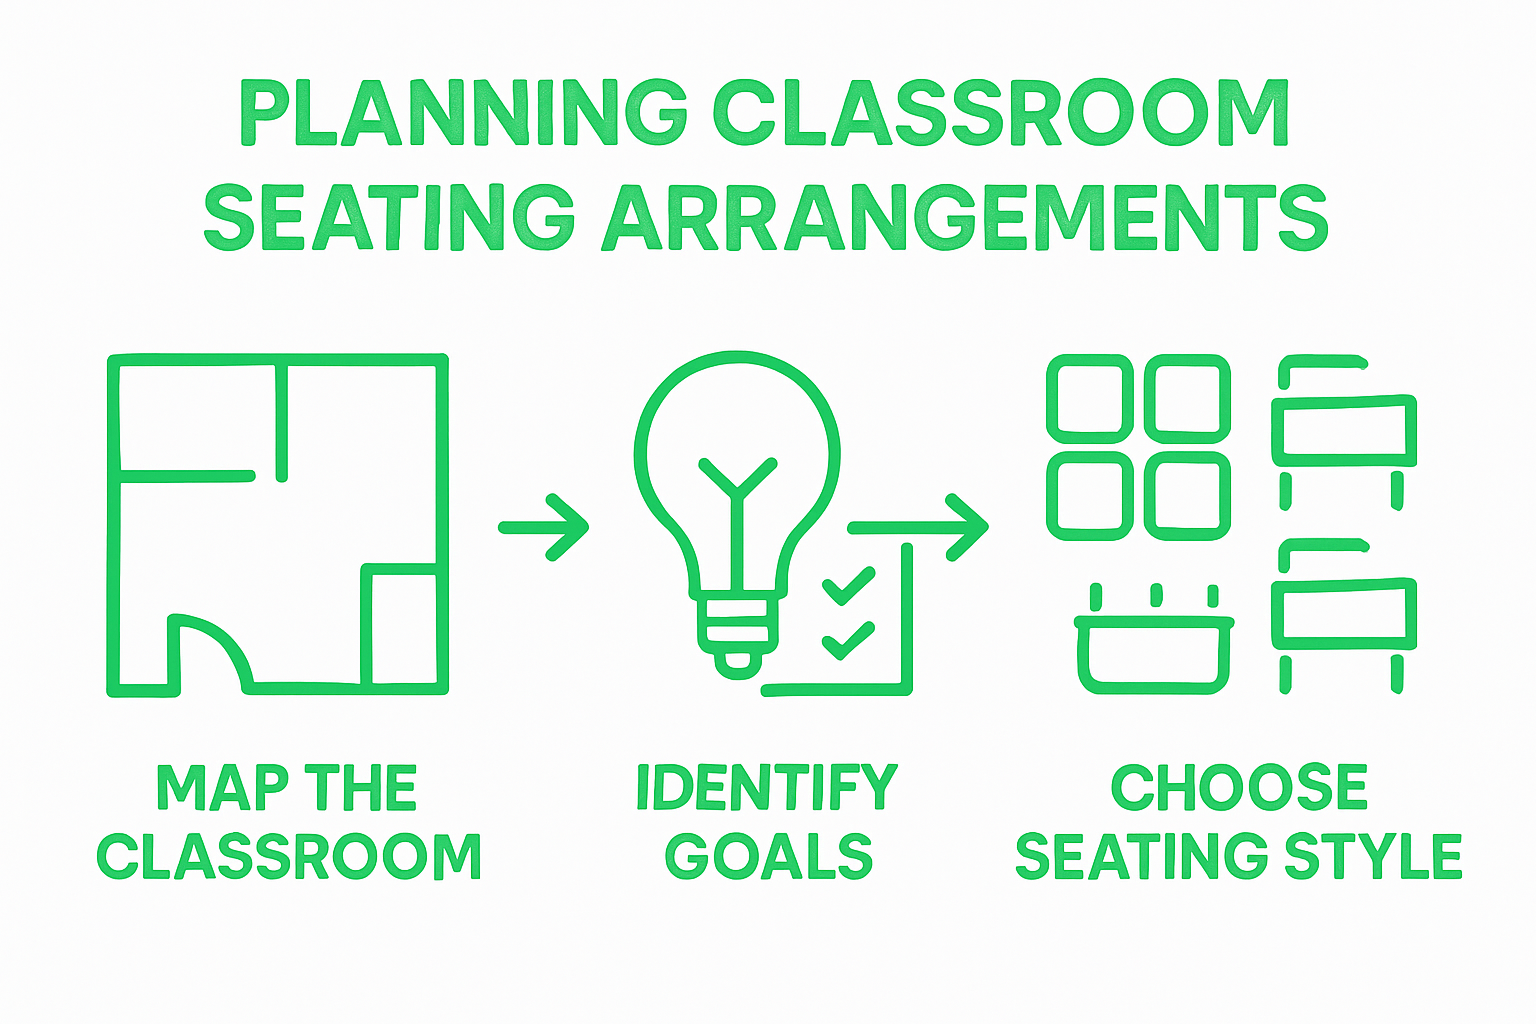
Master Classroom Seating Arrangements for Enhanced Learning
27th Aug 2025
Master Classroom Seating Arrangements for Enhanced Learning
Classroom seating might seem like a simple task. You push a few desks around and call it a day, right? Funnily enough, studies show that seating arrangements can impact learning outcomes so much that just three square feet per student can make all the difference in group activities. Most people never realise that the way you arrange your chairs is actually one of the most powerful teaching tools you have.
Table of Contents
- Step 1: Evaluate Your Space And Requirements
- Step 2: Define Your Learning Objectives
- Step 3: Select Appropriate Seating Styles
- Step 4: Arrange Seating According To Selected Styles
- Step 5: Test And Adjust The Arrangement
- Step 6: Gather Feedback And Finalize Setup
Quick Summary
| Key Point | Explanation |
|---|---|
| 1. Measure Your Classroom Space Accurately | Obtain precise measurements to identify effective seating configurations and optimize both comfort and efficiency. |
| 2. Align Seating with Learning Objectives | Match seating arrangements to your specific educational goals, ensuring they facilitate student engagement and collaboration. |
| 3. Choose Flexible Seating Styles | Select adaptable seating options that can be easily reconfigured to support varying teaching methods and learning activities. |
| 4. Test and Adjust Regularly | Continuously observe and modify the seating arrangement based on student behaviors and engagement to enhance learning dynamics. |
| 5. Gather Diverse Feedback | Use student and colleague input to refine the seating setup, ensuring it meets the needs of all learners and fosters a responsive environment. |
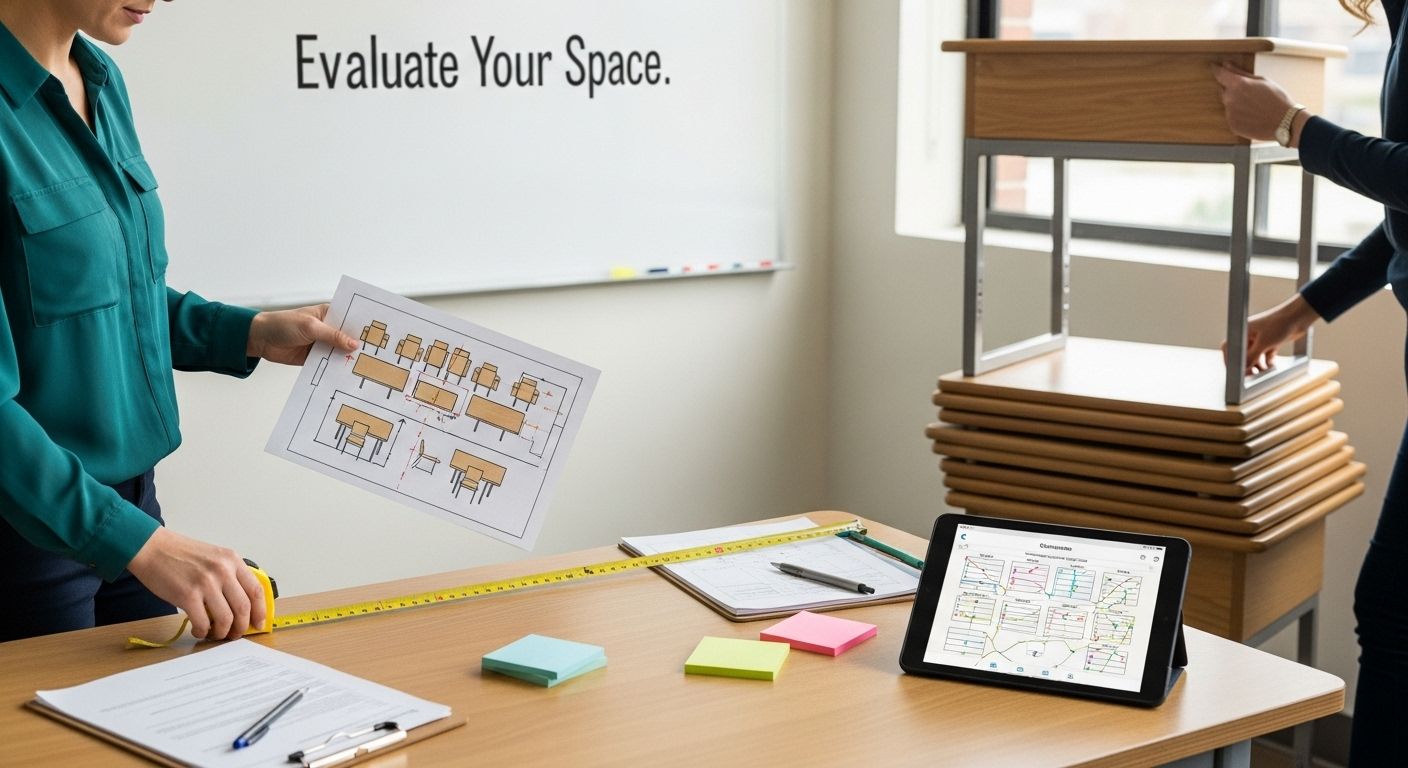
Step 1: Evaluate Your Space and Requirements
Successful classroom seating arrangements begin with a comprehensive understanding of your physical environment and learning objectives. Before diving into specific layouts, you need to conduct a thorough spatial assessment that considers multiple critical factors.
Start by carefully measuring your classroom’s dimensions, paying close attention to total square footage, wall lengths, window placements, and potential obstacles like built‑in shelving or technological equipment. Precise measurements are crucial for determining realistic seating configurations that maximize both space efficiency and student comfort. Use a reliable measuring tape and create a rough sketch of your room, noting exact measurements and potential layout challenges.
Carefully consider your classroom’s specific functional requirements. Different educational approaches and teaching styles demand unique spatial configurations. A lecture‑style environment requires different arrangements compared to collaborative learning spaces. Assess your typical classroom activities: Will students work in small groups? Do you need space for presentations? Will technology stations be incorporated? These questions help you design a seating plan that supports your pedagogical goals.
According to California Department of Education guidelines, classrooms should provide adequate space for circulation, small‑group interactions, and accessibility. Aim to maintain clear pathways that allow easy movement between seats, ensuring students with diverse mobility needs can navigate the space comfortably. Critically evaluate potential traffic flow patterns and potential bottlenecks that might disrupt learning dynamics.
Remember that classroom seating arrangements are not static blueprints but adaptable frameworks. Your initial evaluation should remain flexible, allowing for future modifications as you observe how students interact within the space. By approaching this first step methodically and thoughtfully, you lay the groundwork for a dynamic, responsive learning environment that supports educational excellence.
Below is an overview table summarising each main step involved in mastering classroom seating arrangements, including core actions and intended outcomes for reference.
| Step | Main Action | Key Outcome |
|---|---|---|
| 1 | Evaluate space and requirements | Room size and needs are fully understood |
| 2 | Define learning objectives | Arrangement aligns with teaching goals |
| 3 | Select seating styles | Seating style supports learning activities |
| 4 | Arrange seating | Physical layout is implemented |
| 5 | Test and adjust | Observed layout is refined for engagement |
| 6 | Gather feedback and finalise | Configuration is optimised based on feedback |
Step 2: Define Your Learning Objectives
Defining clear learning objectives is the critical bridge between classroom space and effective teaching strategy. This step transforms your physical environment into a purposeful learning landscape, where seating arrangements become strategic tools for educational success.
Begin by conducting a thorough assessment of your primary instructional goals. Different learning objectives demand distinct spatial configurations. Are you focusing on collaborative problem solving, lecture‑style knowledge transfer, interactive discussions, or independent study? Each pedagogical approach requires a unique seating strategy that supports student engagement and information absorption.
Consider the cognitive and social dynamics you want to cultivate. If your objective centers on group problem solving, you might prioritize clustered seating that facilitates teamwork and peer interaction. Conversely, if your goal involves direct instruction or individual focused work, a more traditional row‑based arrangement might serve you better. The key is aligning physical space with educational intent.
According to Yale’s Poorvu Center for Teaching and Learning, classroom seating should be viewed as a dynamic tool that can be adjusted to support different learning modes. This means your initial configuration is not permanent but adaptable to evolving educational objectives.
As you define your learning goals, think beyond immediate classroom interactions. Consider long‑term skill development, student comfort, and the psychological impact of spatial arrangements. A well‑designed seating plan can encourage communication, reduce learning barriers, and create an inclusive environment that supports diverse learning styles.
Verify your objectives by asking fundamental questions: Does this arrangement support my primary teaching goals? Can students easily collaborate or focus as needed? Will the seating configuration enhance or hinder student participation? Your answers will guide you toward a thoughtful, intentional classroom design that transforms physical space into a powerful learning instrument.
Step 3: Select Appropriate Seating Styles
Choosing the right seating style transforms classroom dynamics from passive spaces into active learning environments. Your selection will directly impact student engagement, interaction, and overall educational experience. Understanding the nuanced strengths of different seating arrangements is crucial for creating an optimal learning atmosphere.
Traditional row arrangements remain a powerful option for certain learning scenarios. These configurations work exceptionally well during individual assessments, focused study periods, and direct instruction scenarios. By providing clear sightlines to the instructor and minimizing potential distractions, rows support concentration and structured learning. However, they can limit student interaction and collaboration, making them less suitable for group‑based activities.
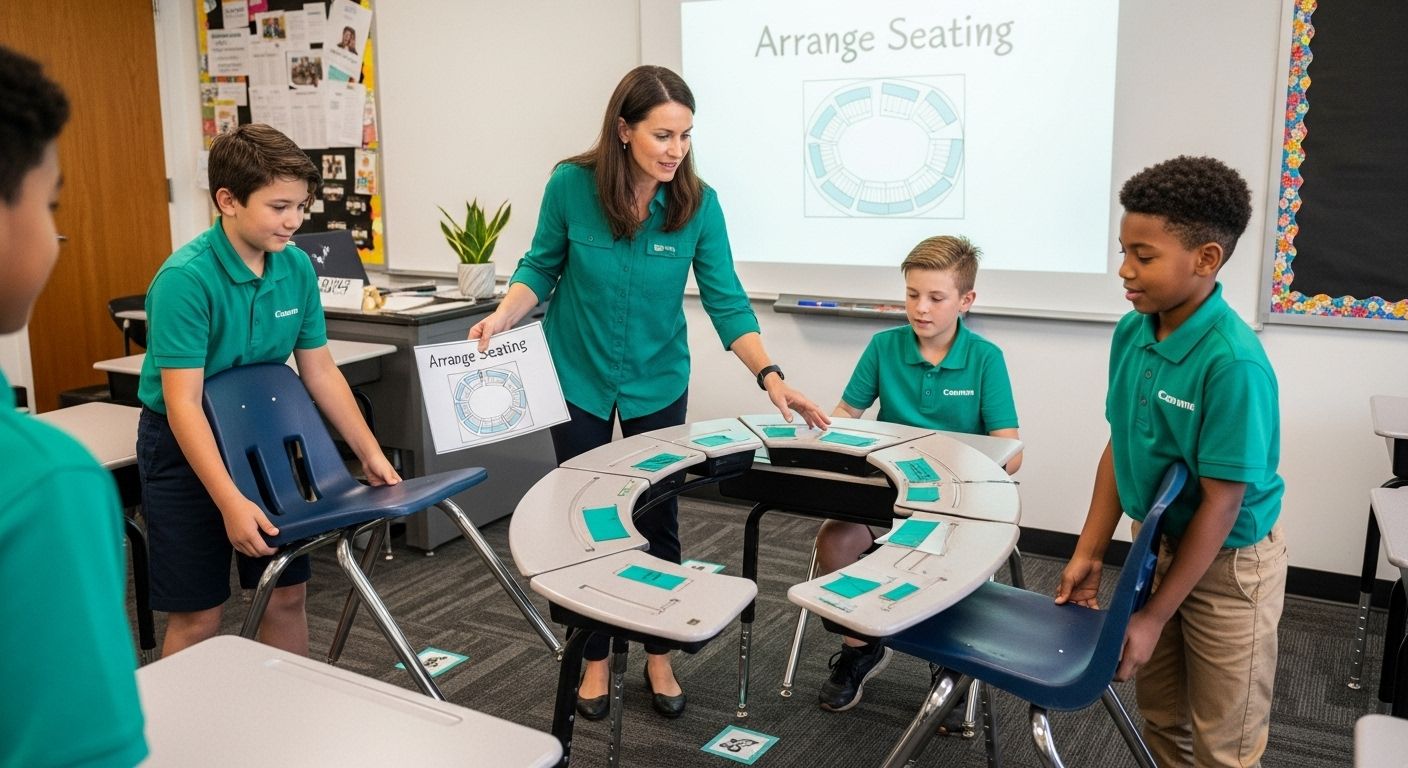
Alternative seating styles offer more dynamic possibilities. Clustered or pod‑style arrangements encourage collaborative learning, allowing students to work closely together on group projects, problem‑solving tasks, and interactive discussions. These configurations break down traditional barriers between learners, fostering communication, peer learning, and shared understanding. Circular or horseshoe layouts similarly promote whole‑class engagement, ensuring every student has visibility and opportunities to participate.
According to Yale’s Poorvu Center for Teaching and Learning, the most effective classroom design is one that remains flexible. Consider implementing modular furniture or lightweight seating that can be easily reconfigured to match different learning objectives. This adaptability allows you to seamlessly transition between lecture‑style instruction, group work, and individual study without significant disruption.
When selecting your seating style, critically evaluate your specific classroom context. Consider factors like student age, subject matter, technological requirements, and typical lesson structures. No single arrangement works universally—the most successful classrooms treat seating as a dynamic tool that can be adjusted to support evolving educational goals.
The following table compares popular classroom seating styles, outlining their main strengths and the learning situations they best support based on the guidance given in the article.
| Seating Style | Strengths | Best Used For |
|---|---|---|
| Traditional Rows | Clear sightlines, focused attention | Lectures, exams, individual study |
| Clusters/Pods | Facilitates teamwork, peer learning | Group work, discussions, collaboration |
| Horseshoe/Circular | Whole-class engagement, visibility | Interactive lessons, debates |
| Flexible/Modular | Adaptable, supports transitions | Mixed activities, changing objectives |
Verify your seating style’s effectiveness by observing student engagement, participation levels, and overall learning outcomes. Be prepared to experiment and make adjustments. The perfect classroom arrangement is not a fixed destination but a continuous journey of refinement and adaptation.
Step 4: Arrange Seating According to Selected Styles
Arranging classroom seating is a delicate art that balances physical logistics with pedagogical intentions. Once you have selected your preferred seating style, the implementation requires precision, creativity, and strategic thinking to transform your classroom layout into an effective learning environment.
Begin with foundational spatial considerations. Measure and mark your intended seating positions, ensuring adequate space between students for comfortable movement and interaction. Aim for approximately 3 square feet per student in collaborative arrangements and slightly more in traditional row configurations. Use removable floor markers or painter’s tape to visualize potential layouts before physically moving furniture, allowing you to experiment without permanent commitment.
Pay close attention to sightlines and accessibility. Ensure every student has a clear view of instructional areas, whether that means the whiteboard, presentation screen, or instructor’s primary teaching space. In horseshoe or circular arrangements, angle seats slightly inward to maximize visibility and encourage engagement. For row‑based layouts, stagger seats to prevent visual obstructions and create natural pathways for instructor movement.
According to research from the Journal of Learning Spaces, classroom layout significantly impacts student participation and learning dynamics. Consider creating flexible zones within your arrangement that allow quick transitions between different learning modes. This might involve using lightweight, movable chairs or modular desks that can be rapidly reconfigured to support group work, individual study, or whole‑class discussions.
Remember that seating arrangement is not a one‑time task but an ongoing process of refinement. Observe how students interact within the space, noting areas of friction, engagement levels, and potential improvements. Be prepared to make incremental adjustments, treating your classroom layout as a dynamic learning tool rather than a static blueprint.
Verify your arrangement’s effectiveness by monitoring student behavior, participation rates, and overall classroom energy. The ideal configuration will feel natural, support your educational objectives, and create an inclusive environment that encourages active learning and collaboration.
Step 5: Test and Adjust the Arrangement
Testing and adjusting your classroom seating arrangement is a critical, often overlooked phase that transforms theoretical planning into practical success. This step is about creating a responsive learning environment that adapts to real‑world classroom dynamics, student interactions, and emerging educational needs.
Begin your testing phase with deliberate, systematic observation. During the first few days of implementation, closely monitor student behaviors, engagement levels, and overall classroom flow. Pay attention to subtle indicators like student body language, ease of movement, participation rates, and potential friction points in the seating configuration. Are students able to collaborate effectively? Do they seem comfortable and focused? Are there unexpected challenges emerging from your chosen layout?
Document your observations meticulously. Consider keeping a brief daily log that tracks student interactions, learning outcomes, and any disruptions or challenges. Look for patterns that suggest necessary modifications. Some seating arrangements might work brilliantly during group discussions but prove less effective during individual study periods. Your goal is to develop a flexible, dynamic seating strategy that can be quickly adjusted to support different learning activities.
According to Vanderbilt University’s IRIS Center, there is no universal perfect classroom layout. Effective teachers continuously vary and adjust seating configurations to match specific instructional demands. This might mean transitioning from rows during individual work to clustered arrangements for collaborative projects, or creating hybrid layouts that support multiple learning modes within a single session.
Dont be afraid to make incremental changes. Sometimes minor adjustments—like slightly rotating a desk, creating wider walkways, or repositioning a student—can dramatically improve classroom dynamics. Involve students in the process by soliciting their feedback and observations. Their perspectives can provide invaluable insights into the effectiveness of your seating arrangement.
Verify your arrangement’s success by tracking measurable outcomes: student participation rates, task completion times, overall classroom engagement, and qualitative feedback from students and colleagues. Remember that classroom seating is an evolving experiment, not a fixed solution. Remain open, flexible, and committed to continuous improvement.
Step 6: Gather Feedback and Finalize Setup
Gathering comprehensive feedback is the critical final stage in creating an optimal classroom seating arrangement. This step transforms your initial design from a theoretical concept into a collaborative, student‑centered learning environment that truly supports educational objectives and student needs.
Create multiple feedback channels to capture diverse perspectives. Design a structured yet accessible approach to collecting input from students, focusing on their comfort, engagement, and learning experience. Develop a simple, anonymous survey that allows students to share honest observations about the seating arrangement. Ask specific questions about their ability to participate, see instructional materials, interact with peers, and feel comfortable during different learning activities.
Extend your feedback collection beyond student perspectives. Consult with colleagues, teaching assistants, and other educators who observe your classroom dynamics. Their external viewpoint can reveal subtle insights you might have missed. Professional observations can highlight functional aspects of your seating arrangement that students might not recognize, such as traffic flow, accessibility, and alignment with broader pedagogical strategies.
According to the U.S. Department of Education’s National Center on Safe Supportive Learning Environments, engaging students as partners in classroom improvements can significantly enhance their engagement and academic achievement. Consider creating a short feedback activity that transforms data collection into a learning opportunity, perhaps having students analyze and discuss the classroom layout as part of a broader lesson on spatial design and collaborative learning.
As you compile feedback, look for consistent themes and patterns. Some variations in individual preferences are normal, but recurring comments about specific challenges or opportunities warrant serious consideration. Be prepared to make incremental adjustments that address genuine concerns while maintaining the core educational objectives of your seating arrangement.
Finalize your setup by synthesizing all collected feedback, making strategic modifications, and creating a flexible framework that can continue to evolve. The most effective classroom seating is not a static design but a responsive system that adapts to changing educational needs and student dynamics. Commit to ongoing observation and adjustment, treating your classroom layout as a living, breathing educational tool.
Transform Your Classroom Space for Better Learning Outcomes
Struggling to implement flexible seating arrangements that truly support active collaboration and individual focus? You are not alone. Many educators find it difficult to align their classroom layouts with diverse learning styles and ever-changing objectives. The article highlighted how critical adaptable seating, clear pathways, and ergonomic comfort are for sustained engagement and productivity. By combining the insights from “Master Classroom Seating Arrangements for Enhanced Learning” with the right resources, you can create a responsive and inspiring classroom environment.
Take action now and browse Office Stock’s range of premium office furniture. Our ergonomic chairs, adjustable desks and flexible storage solutions are perfect for classroom transformation. Give your learners a space that encourages collaboration, comfort and achievement. Visit our website today to find out how our tailored classroom and workspace solutions can help you turn your design plan into a real success.
Frequently Asked Questions
What factors should I consider when evaluating my classroom space for seating arrangements?
When evaluating your classroom space, consider the dimensions, wall lengths, window placements, and obstacles such as built-in shelving. It’s also essential to assess functional requirements like circulation space, group interactions, and accessibility for all students.
How can I define learning objectives to inform my classroom seating arrangement?
To define learning objectives, assess what you want to achieve in your classroom—whether it’s collaborative learning, individual study, or direct instruction. Different goals will require unique seating styles that support student engagement and interaction.
What are the benefits of various seating styles in a classroom?
Different seating styles, such as traditional rows or clustered arrangements, cater to different learning scenarios. Rows are great for focused instruction, while clusters facilitate collaboration and peer interaction, making it easier for students to work together on projects and discussions.
How can I test and adjust my classroom seating arrangement effectively?
To test your seating arrangement, observe student engagement and participation over the initial days. Keep a daily log of interactions and any challenges that arise. Be willing to make incremental adjustments based on student feedback and observed dynamics to optimize the learning environment.